One of BioDynaMo's built-in biological processes is extracellular diffusion. It is the process of extracellular substances diffusing through space. The constants that govern the diffusion process can be set by the user. Let's go through an example where diffusion plays a role.
Copy the demo code
diffusion is one of many installed demos in BioDynaMo. It can be copied out
with biodynamo demo.
bdm demo diffusion .Inspect the code
Go into the diffusion directory and open the source file src/diffusion.h in your favorite editor.
We can note the following things from its content:
1. Substance list
enum Substances { kKalium };The extracellular substances that will be used in the simulation are listed in
an enum data structure. In this case it is just a single substance. According to our C++
coding style we will prepend the substance's name with the letter "k".
2. Initial model
First, create a BioDynaMo simulation:
Simulation simulation(argc, argv);Next up is creating the initial model of our simulation. We start by defining the substance that cells may secrete
ModelInitializer::DefineSubstance(kKalium, "Kalium", 0.4, 0, 25);Next, we have to create an initial set of agents and set their attributes:
  auto construct = [&](const Real3& position) {
    Cell* cell = new Cell(position);
    cell->SetDiameter(30);
    cell->SetMass(1.0);
    cell->AddBehavior(new Chemotaxis("Kalium", 0.5));
    return cell;
  };
  ModelInitializer::Grid3D(2, 100, construct);

   // The cell responsible for secretion
  Cell secreting_cell({50, 50, 50});
  secreting_cell.AddBehavior(new Secretion("Kalium", 4));
  simulation.GetExecutionContext()->AddAgent(&secreting_cell);
The construct lambda defines the properties of each cell that we create. These can be
physical properties (diameter, mass), but also biological properties and behaviors
(chemotaxis, substance secretion)
This example uses the predefined behaviors Chemotaxis and Secretion that
will govern the behavior of the agents (i.e. cells).
These two behaviors are included by default in BioDynaMo.
One of the cells (the cell at position {50, 50, 50}) will be the one secreting the substance;
it therefore gets assigned the Secretion behavior.
All other cells are assigned the Chemotaxis behavior.
Basically it makes cells move according to the gradient,
caused by a spatial concentration difference of the substance.
Simulation Parameters
Create a bdm.toml file in the diffusion directory, and copy the following lines
into it:
[visualization]
export = true
interval = 10

	[[visualize_agent]]
	name = "Cell"
	additional_data_members = [ "diameter_" ]

	[[visualize_diffusion]]
	name = "Kalium"
	gradient = true
This will enable exporting visualization files, so that we can visualize the simulation after it has finished. Furthermore, we enable the output of the diameter of our agents (by default named "Cell"), and the gradient data of the extracellular diffusion
Build and run the simulation
Run the following commands to build and run the simulation.
bdm runVisualize the simulation
Load the generated ParaView state file as described in Section Visualization.
From "View", select "Animation Panel". This will display some animation settings at the bottom of the screen. From the "Mode" select "Real Time". Then click the Play button at the top of the screen to run the simulation visualization.
Boundary conditions
For a numerical solution, we need to specify the equation, the boundary conditions, and the domain. BioDynaMo supports Neumann, Dirichlet and Periodic boundaries with constant coefficients on a cube domain. For instance, you may specify no-flux boundaries (homogeneous Neumann) via
ModelInitializer::AddBoundaryConditions(
    kKalium, BoundaryConditionType::kNeumann,
    std::make_unique<ConstantBoundaryCondition>(0));
or some Dirichlet boundaries via
ModelInitializer::AddBoundaryConditions(
    kKalium, BoundaryConditionType::kDirichlet,
    std::make_unique<ConstantBoundaryCondition>(1.0));
or Periodic boundaries via
ModelInitializer::AddBoundaryConditions(
    kKalium, BoundaryConditionType::kPeriodic);
The ModelInitializer conveniently wraps the access to the ResourceManager
and sets the boundaries. You can also set the boundaries directly by calling
member functions of the DiffusionGrid (see API documentation).
If you want to implement more sophisticated boundaries (e.g. with spatial
dependence), you may derive classes from BoundaryCondition and implement its
member BoundaryCondition::Evaluate(real_t,real_t,real_t,real_t) accordingly.
If your application required different equations, different domains, different
numerical schemes, please consult the API for Continuum, ScalarField, and
VectorField to see how to interface continuum models with the BioDyanMo
simulation runtime. (see also bdm demo analytic_continuum)
Diffusion parameter constraints
The partial differential equations that describe diffusion are solved
numerically. This is done using a forward in time and central in space finite difference method.
As shown in the figure below. The upper indices label the discretization in
time, and the lower indices describe the discretization in space. The delta
parameters t and h denote length in time and space,
respectively.
The diffusion coefficient D models the speed of the diffusion process through
space, while constant mu controls the speed at which substances
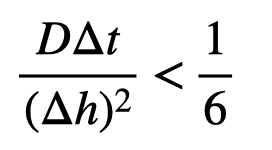
decay. The method is not unconditionally stable, thus we
impose the following constraint on parameters:
Since as a user, you are giving the resolution of the diffusion grid and not the
distance between the grid points, you can determine this value by dividing the
longest dimension of your space by the resolution, or by calling the corresponding
function DiffusionGrid::GetBoxLength().
For more information on the inner workings of the diffusion behavior, please refer to: https://repository.tudelft.nl/islandora/object/uuid%3A2fa2203b-ca26-4aa2-9861-1a4352391e09?collection=education

